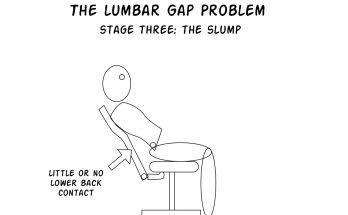
This, in my opinion, is the #1 factor in determining whether an office chair is going to work for you or not. There’s so much variation in personal preference that’ll come from how a chair leans back, yet people usually mention the adjustments when talking about high-end office seating.
Recline methods, on the other hand, determine the distribution of body weight, knee position, shoulder height, and plenty of other factors that’ll impact how easily you’re able to rest your arms on the desk, get things done, and so on.
This post is all about the diagrams, so let’s just jump right in.
Recline Methods
Option 1: Basic Tilt
This is the most basic option, and, to be honest, most often garbage. Cheap chairs in the $50-100 range will often use this system, wherein the entire chair, as one cohesive unit, tilts back in unison.

The problem here is that it keeps the backrest and the seat at the same angle, meaning your torso and thighs need to maintain that same angle. You can’t open up and sprawl back, so it’s just going to feel constricting and uncomfortable, and you’ll want to get up after a while.
Since the front of the chair usually lifts upward (as the tilt occurs at a hinge more or less right about where the seat post fits in), you’re going to bang your knees into a keyboard tray, if you’re using one. And since your feet might come right up off the floor, the back of your thighs will be under more significant pressure from the front edge of the seat. It’s pretty awful.
That said, I’ve tried chairs from Hag that use this system to pretty good effect; they solve these problems by including a backrest flex (detailed down below), and the wheels have footrests on them, so your feet won’t dangle as severely. Aside from that, I haven’t seen anyone do this well. It can work for short periods of time, especially if you’ve got a keyboard up on the desk rather than down on a tray, but it’s not going to work out for all-day use as well as some of the others listed here.
Option 2: Backrest-Only Tilt
This is another almost-garbage recline method, as it only lets the backrest itself tilt, and not the seat.
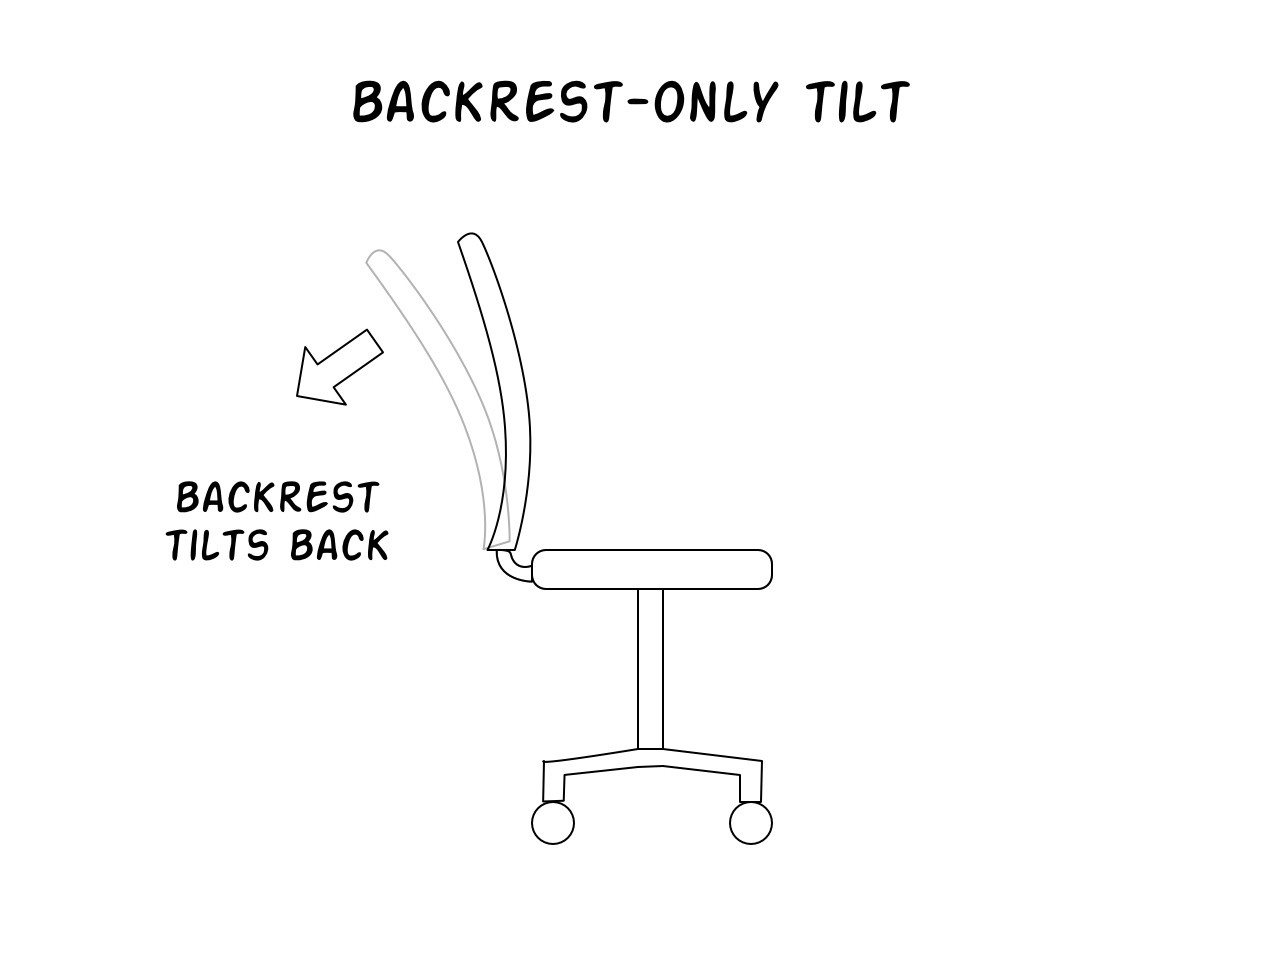
While this allows your upper body and thighs to open to a broader angle, which is nice and relaxing, sooner or later it’ll feel as though your body is just sliding right out of the chair. Since the seat angle stays horizontal, or close to it, there’s nothing to stop your angled torso from exerting forward pressure on your thighs. It also is the worst at creating the “lumbar gap” problem, which is part of why I prefer to avoid these options. This method really needs to be combined with a synchro-tilt, or a seat slider, detailed below.
The Steelcase Think uses a backrest tilt (check out the review here). It has a seat slider as well, but it’s so minimal that it feels like a backrest-tilt only.
Option 3: Synchro-tilt
Okay, we’re finally at a good one. A synchro-tilt mechanism is easily one of the best recline methods available, and fairly common. A synchro-tilt basically combines a basic tilt and a backrest tilt together, so the seat itself tilts back, and the backrest also tilts back, but at a more significant angle:
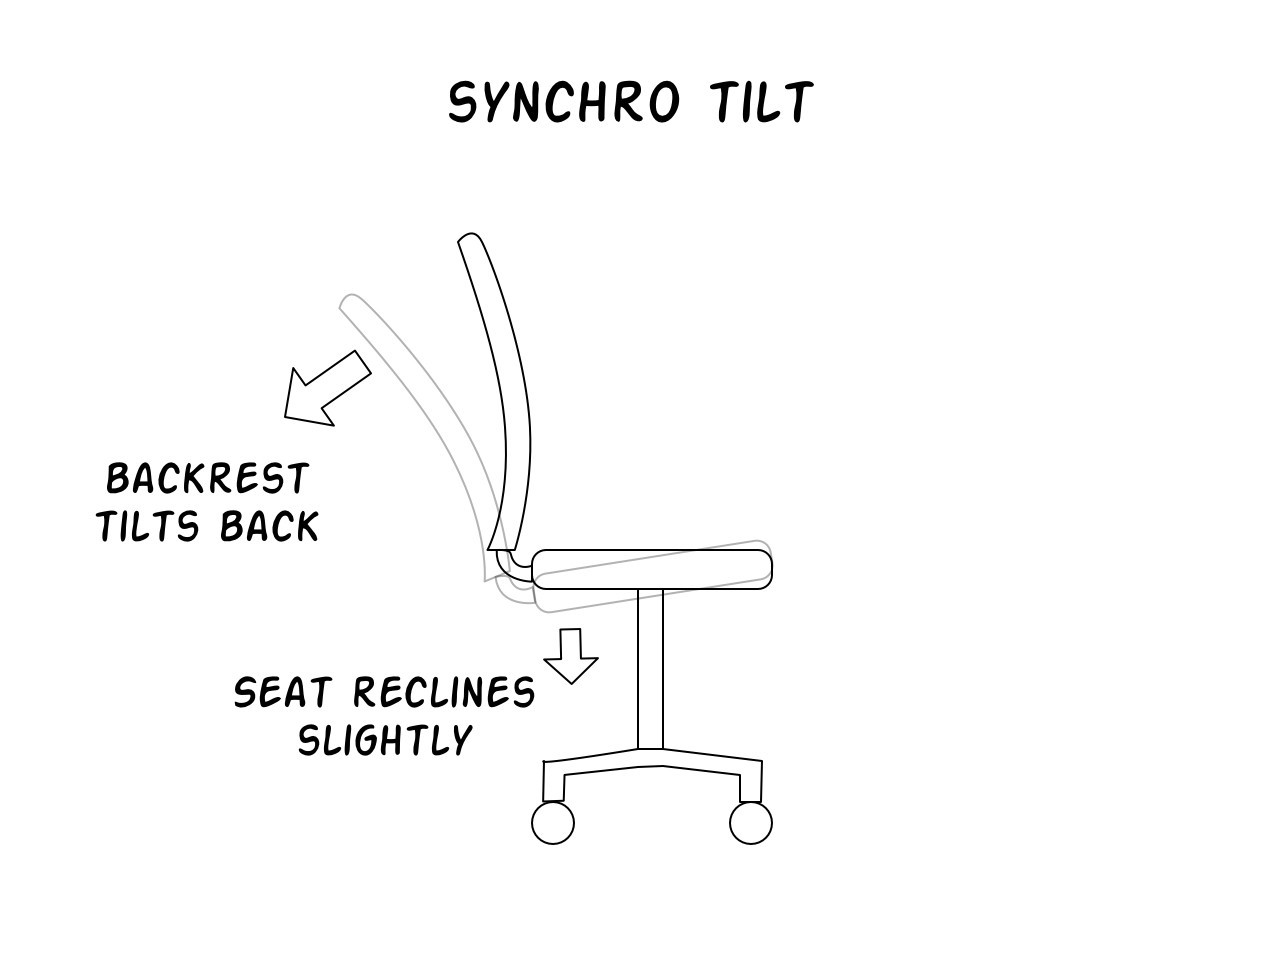
This allows your torso and thighs to expand to a more open angle, which reduces that constricted feeling you eventually get from having to sit upright all the time, but it won’t give you the feeling that you’re sliding out of your chair, since the seat will be angled such that you’ll sink into the seat, not slide forward out of it. It’s really great. Most of my favorites use this method.
You’ll most often find these starting in the mid-range of seating options, in the $100-300 range, and they’re included at the high end of $1,000 options as well. You can’t go wrong with a synchro-tilt, although I prefer adding some of the “accessory” features described down below to accentuate the effectiveness.
Option 4: Seat Slider (and backrest tilt)
You could think of this as simply the combination of two separate features, but since they’re usually featured together in some way, I decided to include this as a recline style, rather than merely a separate feature.
Seat slider chairs move the seat forward as you recline. Imagine the difference between a rocking chair (which is most like a basic tilt) and a glide rocker (which is what a seat slider feels like).
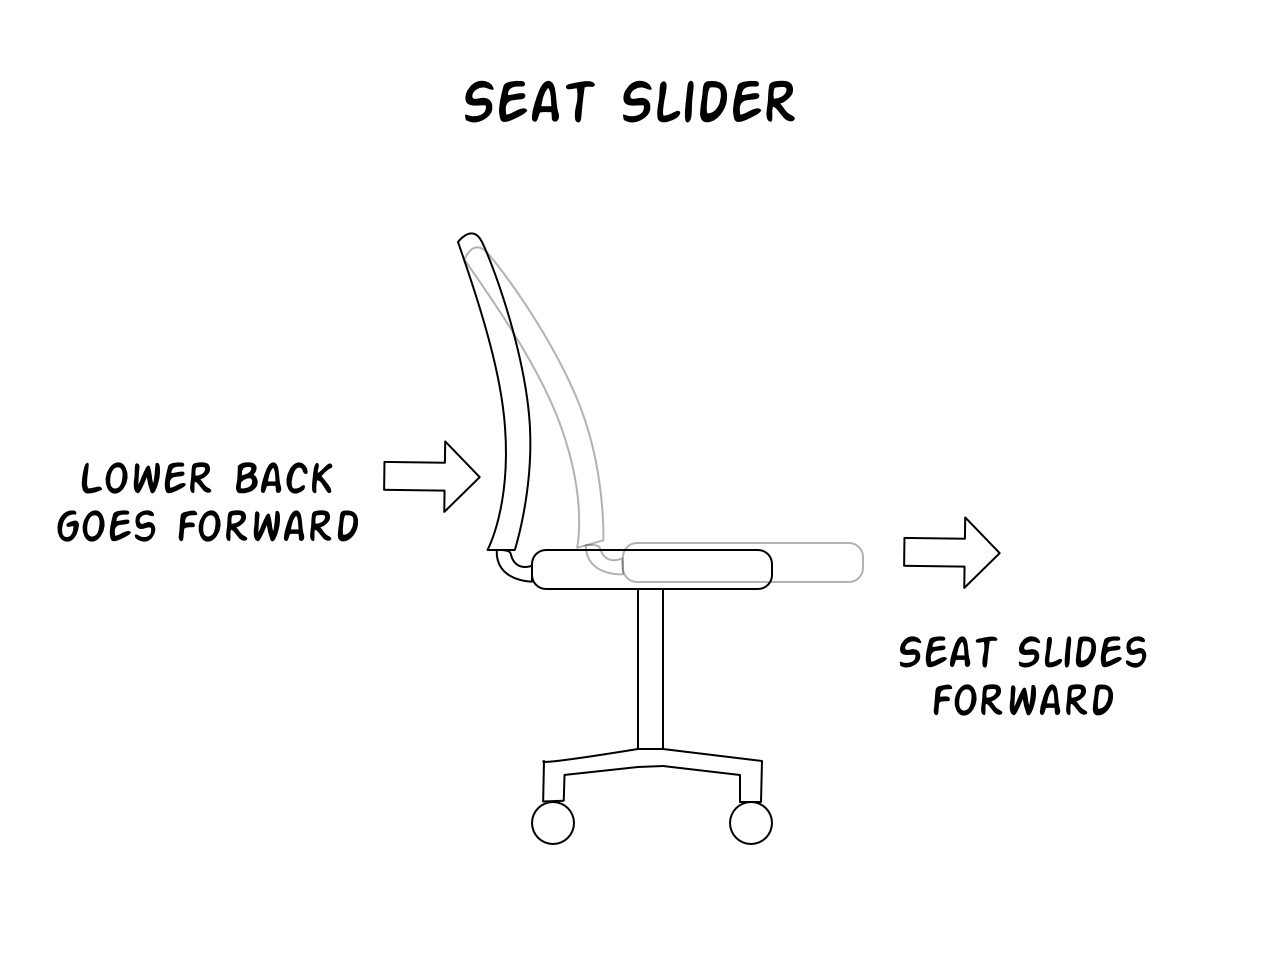
This looks pretty weird at first glance, but it works quite well, somehow solving the problem of sliding out of your chair, as would be the case with a backrest-only tilt mechanism (as the angle of the seat has an impact on this as well). It also keeps your shoulders at the same height, rather than creating that sinking feeling you’d get in a chair that reclines down and back. For keeping your arms at a consistent typing height, this is going to be as good as it gets.
I know of only two chairs that use this feature; the Steelcase Leap, and the Humanscale Diffrient World Chair (reviewed here). The diagram above mostly depicts the Steelcase Leap, where the backrest doesn’t actually lean back, but pushes forward at the lower back, and the seat slides forward to accommodate this. The Diffrient World Chair works similarly, except that it uses an independent backrest swivel (diagrammed below) before reclining further.
Accessory Features
Yes, I’ve invented the term “accessory feature,” because I don’t know if there’s an official term out there or not. Certain chairs add another mechanism, in addition to the recline itself, to accommodate different body types, and seating positions.
Both of these
Accessory Feature 1: Backrest Flex
Does your spine stay in exactly the same shape all day long? No? Well, then you need your backrest to flex. Or something, at least, to accommodate those variations.
A backrest flex works by having a flexible horizontal point along the backrest, right around the lumbar area, allowing the backrest to flex forward and back right in this region:
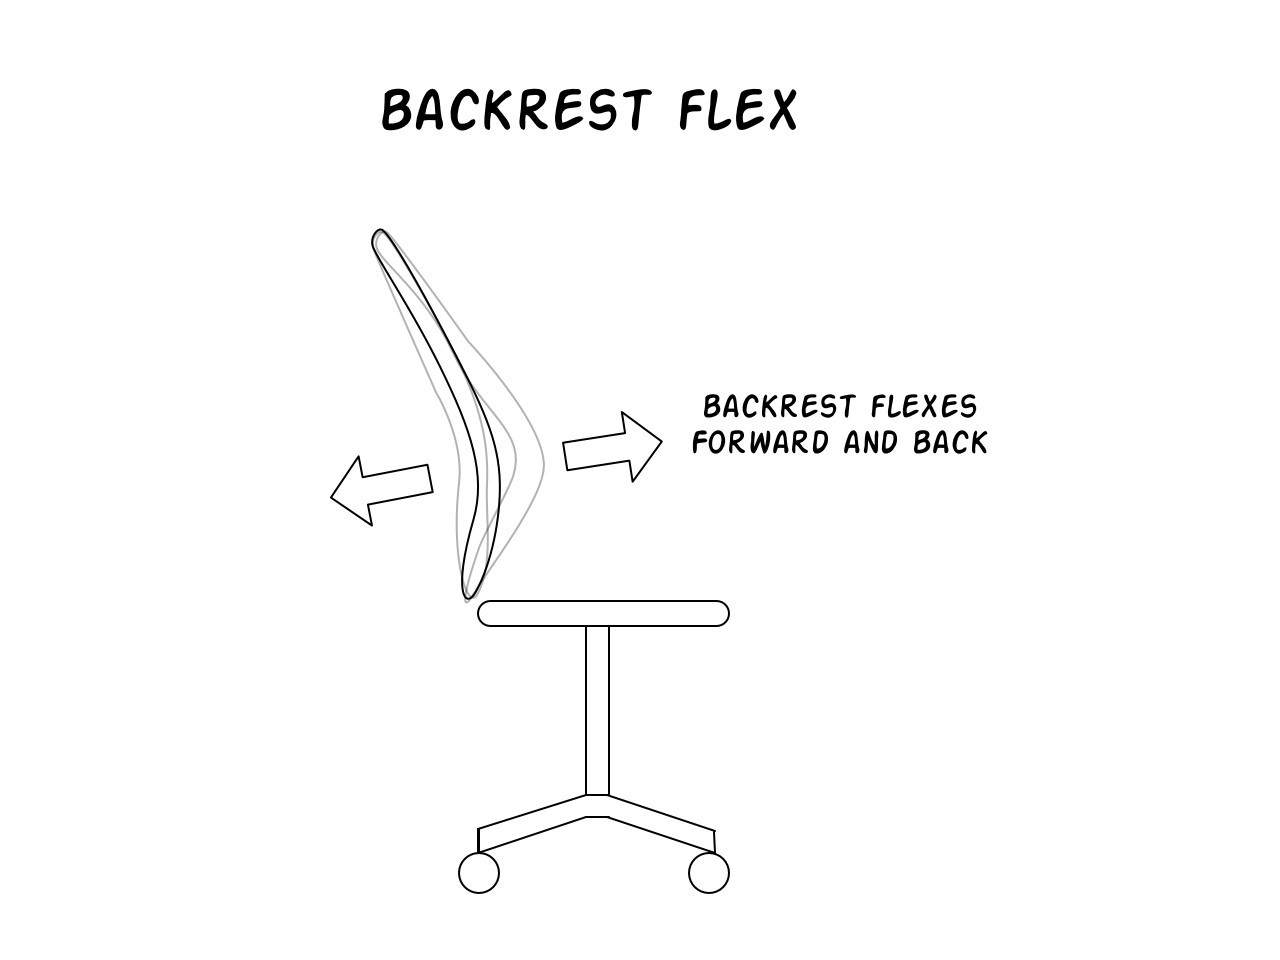
Whether you like aggressive lumbar support or minimal support, the flexy back will follow right along with the curvature of your spine. Some of them will be more flexible than others, of course, but it’s a great feature either way, especially as it’ll help solve the lumbar gap problem.
Steelcase uses this feature pretty often, most notably in their Gesture and Leap chairs, both of which are absolute favorites of mine.
You can accomplish something similar with an adjustable lumbar pad, and although it won’t flex by itself, usually there’ll be some give in the padding to simulate this effect a bit.
Accessory Feature 2: Backrest Swivel
Rather than reclining from a hinge below the seat, a backrest swivel will rotate from a hinge partway up the backrest itself, falling back at the shoulders, and pressing inward at the lower back:
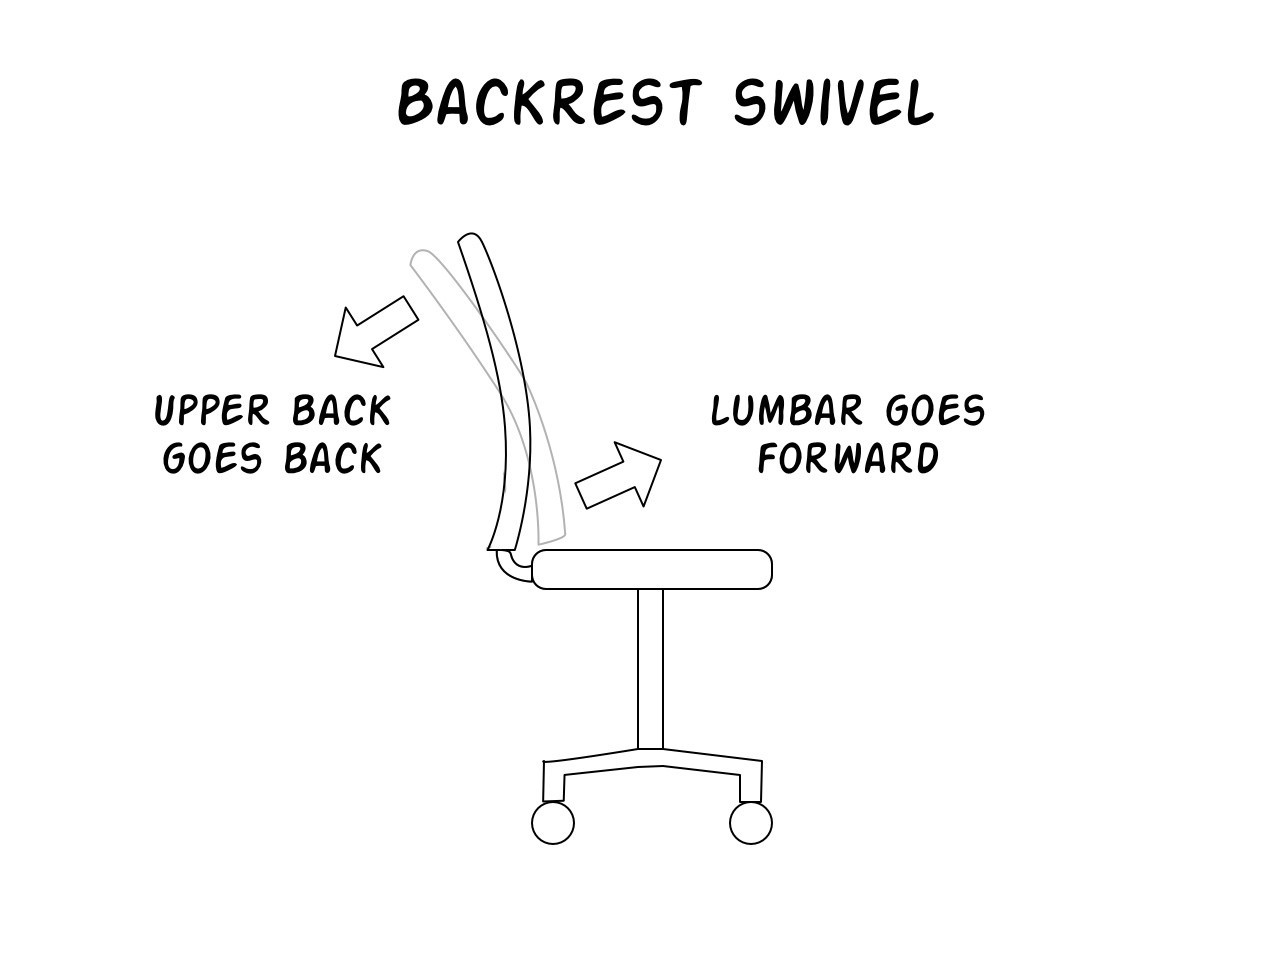
This method moves to accommodate the curvature of your back, and continues moving around if you lean back, or sit more upright. It can work pretty well, but it really has to be combined with a seat slider. Notice how the lower back area moving forward would force your hips to move forward as well? That means you’d want a seat slider to accommodate this.
Humanscale uses this method in quite a few of their chairs, although they only use it in combination with a seat slider in the Humanscale Diffrient World Chair. The other options combine the swivel with a backrest-only tilt, which doesn’t work nearly as well.
Sticky Back vs. Rocker
No diagrams here; just a description.
- Sticky-back chairs kind of “stop” once they reach a certain recline angle, and stay there until you push a little harder to get them to move around. They’re great for maintaining the same angle while you’re typing, to maintain stable position.
- Rockers go back and forth freely, which is great for people who like to fidget and move around a lot, but isn’t so great if you want the stability required for drawing, typing, and so on. Sure, you can adjust the recline tension to make it easier or harder for this to happen, but it won’t “stop” the chair from moving around, and even the slightest pressure forward or back will change the recline angle right away.
This is really a matter of personal preference, but in terms of practically, typing is the most obvious reason to prefer a sticky-back chair, as you can stay in place and feel stable. If you’re a receptionist and you’re on the phone more often than at the keyboard, rockers can work just fine.
Any of the above recline styles could be a sticky-back or a rocker, as it’s just an independent variable. Rockers tend to be more common, especially at the cheaper end of the spectrum.